Leg rub exists. It’s a good reason to wear leggings under dresses; and, it’s what my trousers usually go out from.
Well, it happened again. Unlike the thing with the shirt, it’s not that the clothes I’m fixing are new this time; instead, it’s that, although I’ve kinda walked right through this pair of trousers, replacing them would also be kind of a bother so let’s kick that down the road a bit.
I grabbed a long scrap from the bin, pinned it into place inside the trousers behind the spot where some threads had given out, then threw it on my sewing machine and went back and forth and back and forth and etc. with a basic straight stitch. It’s not as pretty as the shirt either, but I’m not really expecting people to inspect my inner trouser thigh area (if they do, I might need to smack them with my bag, because personal space).
Let’s be honest, they’re still scuffed all to heck and I’m not going to get many more seasons’ wear out of them, but replacing them can still be a later problem.
When something made of synthetic fibers, like polyester or nylon, is fraying because it’s been snagged or torn, you can stop the fray by using a lighter or match to melt the fibers together.
After stopping the fray, you can further repair the item at your leisure, without worrying about whether it will get worse. Or, for casual items where looking a bit scuffed is OK, you can just leave it like that.
Keep in mind the difference between struggle and defeat. You don’t need me to tell you what that difference is — we all struggle with things like poking our fingers, losing yarn chicken, matching colors even when things say they’re the same dye lot, and a million other inconveniences that add up.
What makes us Menders is that those struggles do not defeat us.
A lot of the time, we need to use some embroidery to make a repair look good. But, what if you aren’t already skilled at embroidery? The only way to get good at anything is to practice, but people feel awkward about wearing projects they’ve practiced on out into the world when they still need to improve.
One way around this is to practice on things people won’t see, like washcloths. If you have a washcloth with worn out spots you can use that, but if not, you can add decorative embroidery to a washcloth without it waiting for it to need repair.
Once you have some skills at embroidery, a decorated washcloth can be a good gift for occasions like going to summer camp, dorm move-in day, and housewarming parties.
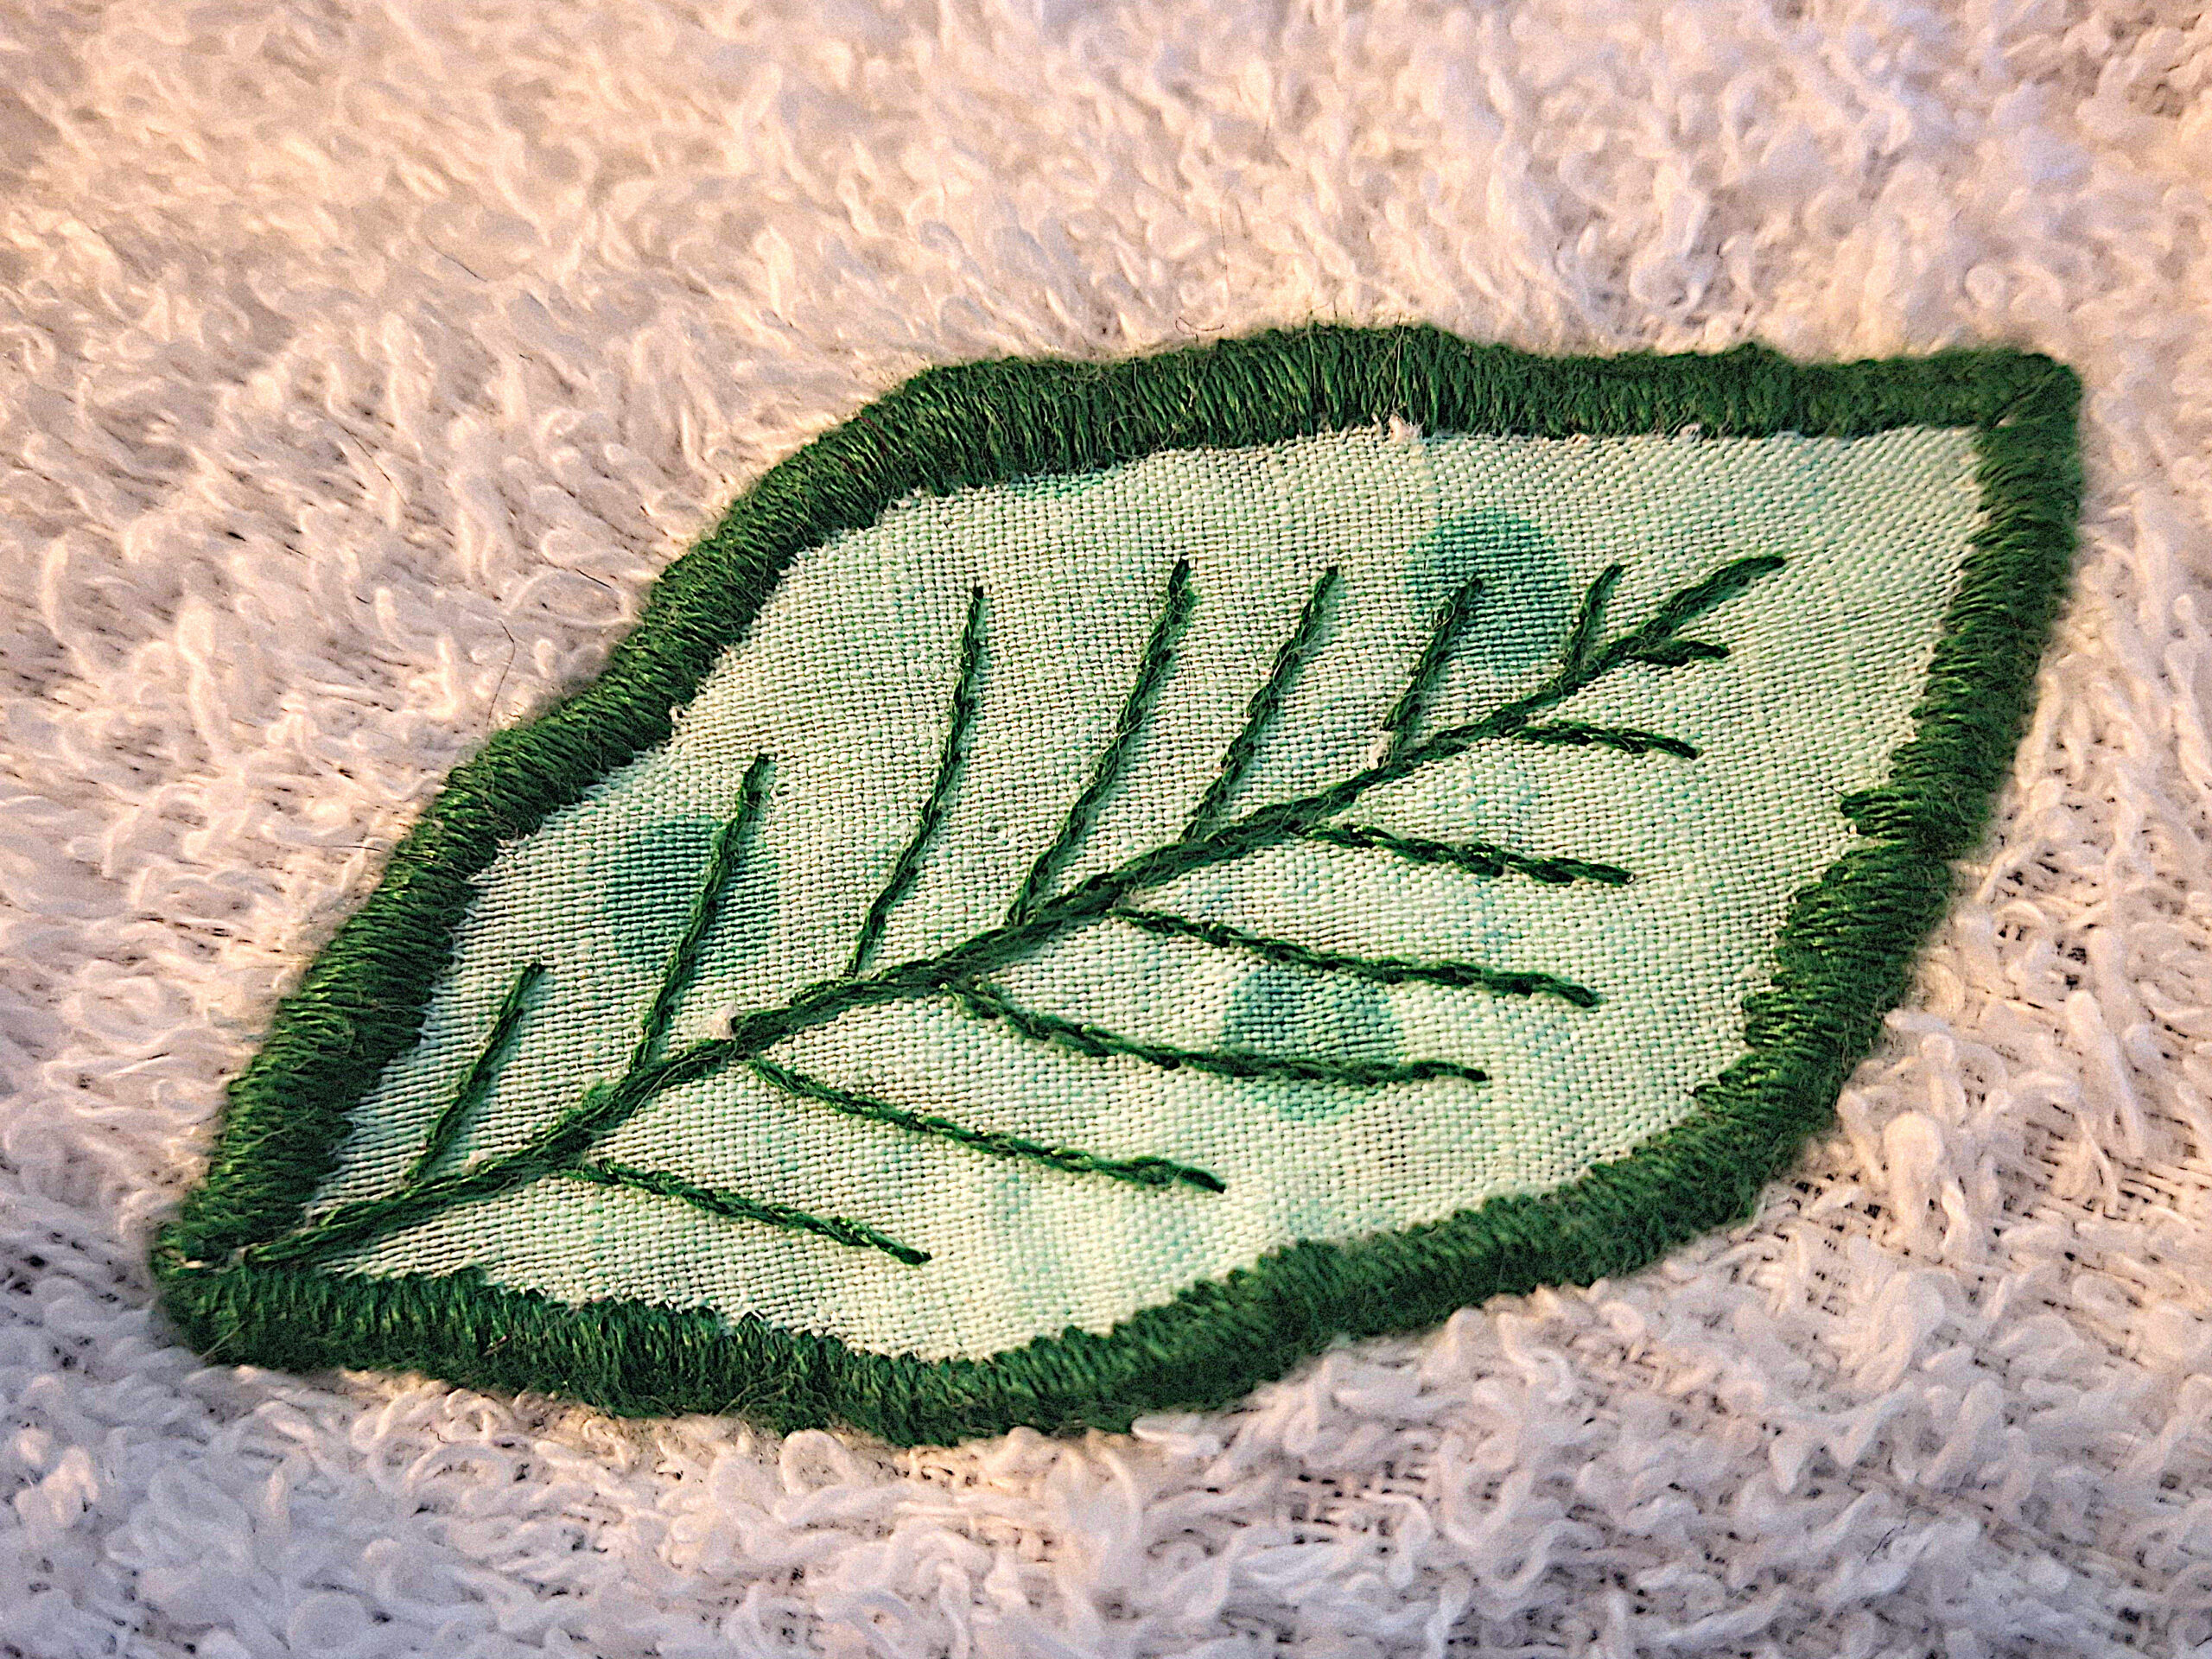
I’m going to demonstrate a leaf, because it’s a simple shape that can make sense at a variety of sizes, and works as a decorative element for any gender’s clothes.
First, find something green in your scrap bin, and place it on the washcloth. (There are no sewing police coming around to stop you from using a different color; fall colors in particular could also make sense, but you could also use anything for your own creative reasons.)
Use chalk, a pencil, or a washable marker to draw two curves that come together to make a simple leaf shape. You can use anything circular as a template, or a drawing compass, or freehand it.
Advanced version of this step: browse PhyloPic for leaves of specific species to copy, by hand or using tracing paper or backlighting.
Baste about half a fingerwidth inside the outline. (We aren’t talking about keeping a turkey from drying out! In the sewing context, basting is sewing some stitches that you plan to take out later, to hold pieces in place while you’re putting them together properly. Basting thread should be a contrast color to make it easy to pick out. Also, since you’ll pick it out and trash it, basting is a good way to use up crummy cheap thread that comes in some kits and value packs.) Theoretically, you could be more precise, and space the basting line from the drawn line by half a centimeter or a quarter inch; if being precise makes you happy, go for it, but if not, it’s OK to embrace the fact that nature makes leaves all kinds of different ways.
Clip off the excess fabric. Depending on how much there is and what you might have a use for, you can toss the excess or put it back in your scrap bin. (The pieces I trimmed off are very small, but I sometimes use scraps for stuffing so I’m keeping even them.)
Fold under a clipped edge at the side, and start satin stitching over the edge. (Satin stitch is straight stitches, so close together that they touch. The exact distance depends on how thick your thread is, so I used three strands of embroidery floss from my stash instead of two.) Tuck the end of the embroidery cross into the fold so the stitches will hold it in place and it will be snag-proof.
If you have a sewing machine, you can also use a wide and extremely short machine zigzag stitch as a satin stitch outline. Go very slowly, and use a tool like a toothpick or crochet hook to guide the folding-under instead of getting your fingers close to the needle while the machine is running.
Work your way around toward the point, folding and satin stitching as you go.
When you get close to the point, fold from both sides and pinch hard to crease the point. Clip across a bit past the point so it won’t be so bulky, then fold again, and satin stitch to the end. Shorten your stitches when you get very near the point to leave room for the other side on the way back.
Turn the leaf around, and start stitching back, first with short stitches to match up and make a corner with the previous short stitches, then regular length stitches to continue.
Keep going around the edge the same way.
When you get to the other point, do the same things you did for the first point.
Then, keep going around the part of the first edge that was behind the first stitches you put in.
When you get close to back to the beginning, the fabric being folded under might look a bit popped out or puffy. Keep pressing it into place and stitching it down.
You can pick out the basting stitches now, and if you want or need to stop that’s fine — you’ve got a leaf!
However, if you want to keep going, you can use stem stitch to represent the leaf’s veins. Stem stitch is like satin stitch in that each stitch touches the thread of the previous stitch. However, instead of going through the fabric through holes that are side by side and advancing sideways, stem stitches work their way forward lengthwise.
Stitching through the patch and the main fabric in the interior also makes the repaired item stronger.
Thread up your needle again if you ran out of your previous length of thread on the satin stitches or want to change anything about what you’re using. (Both are true for me: my thread was short enough that I had to re-thread for each of the last few stitches, and I’m using two strands instead of three for the center vein.)
Start at a corner and stitch forward into the leaf’s interior. On the back of the fabric, go backward but not all the way, then take another stitch forward. (You can catch the thread tail on the back as you go, or deal with it later.)
Continue down the middle of the leaf until you’re most of the way to the end. I paused partway to split the thread down to one strand, to make the line of stem stitches thinner; you can do that or not, either way.
You can also use stem stitch to represent side veins coming off of the main veins. I used one strand of floss for this, to make the side veins thinner than most of the main vein.
There are many different leaf vein patterns, so if you’d like to make something that looks different, feel free to research and experiment.
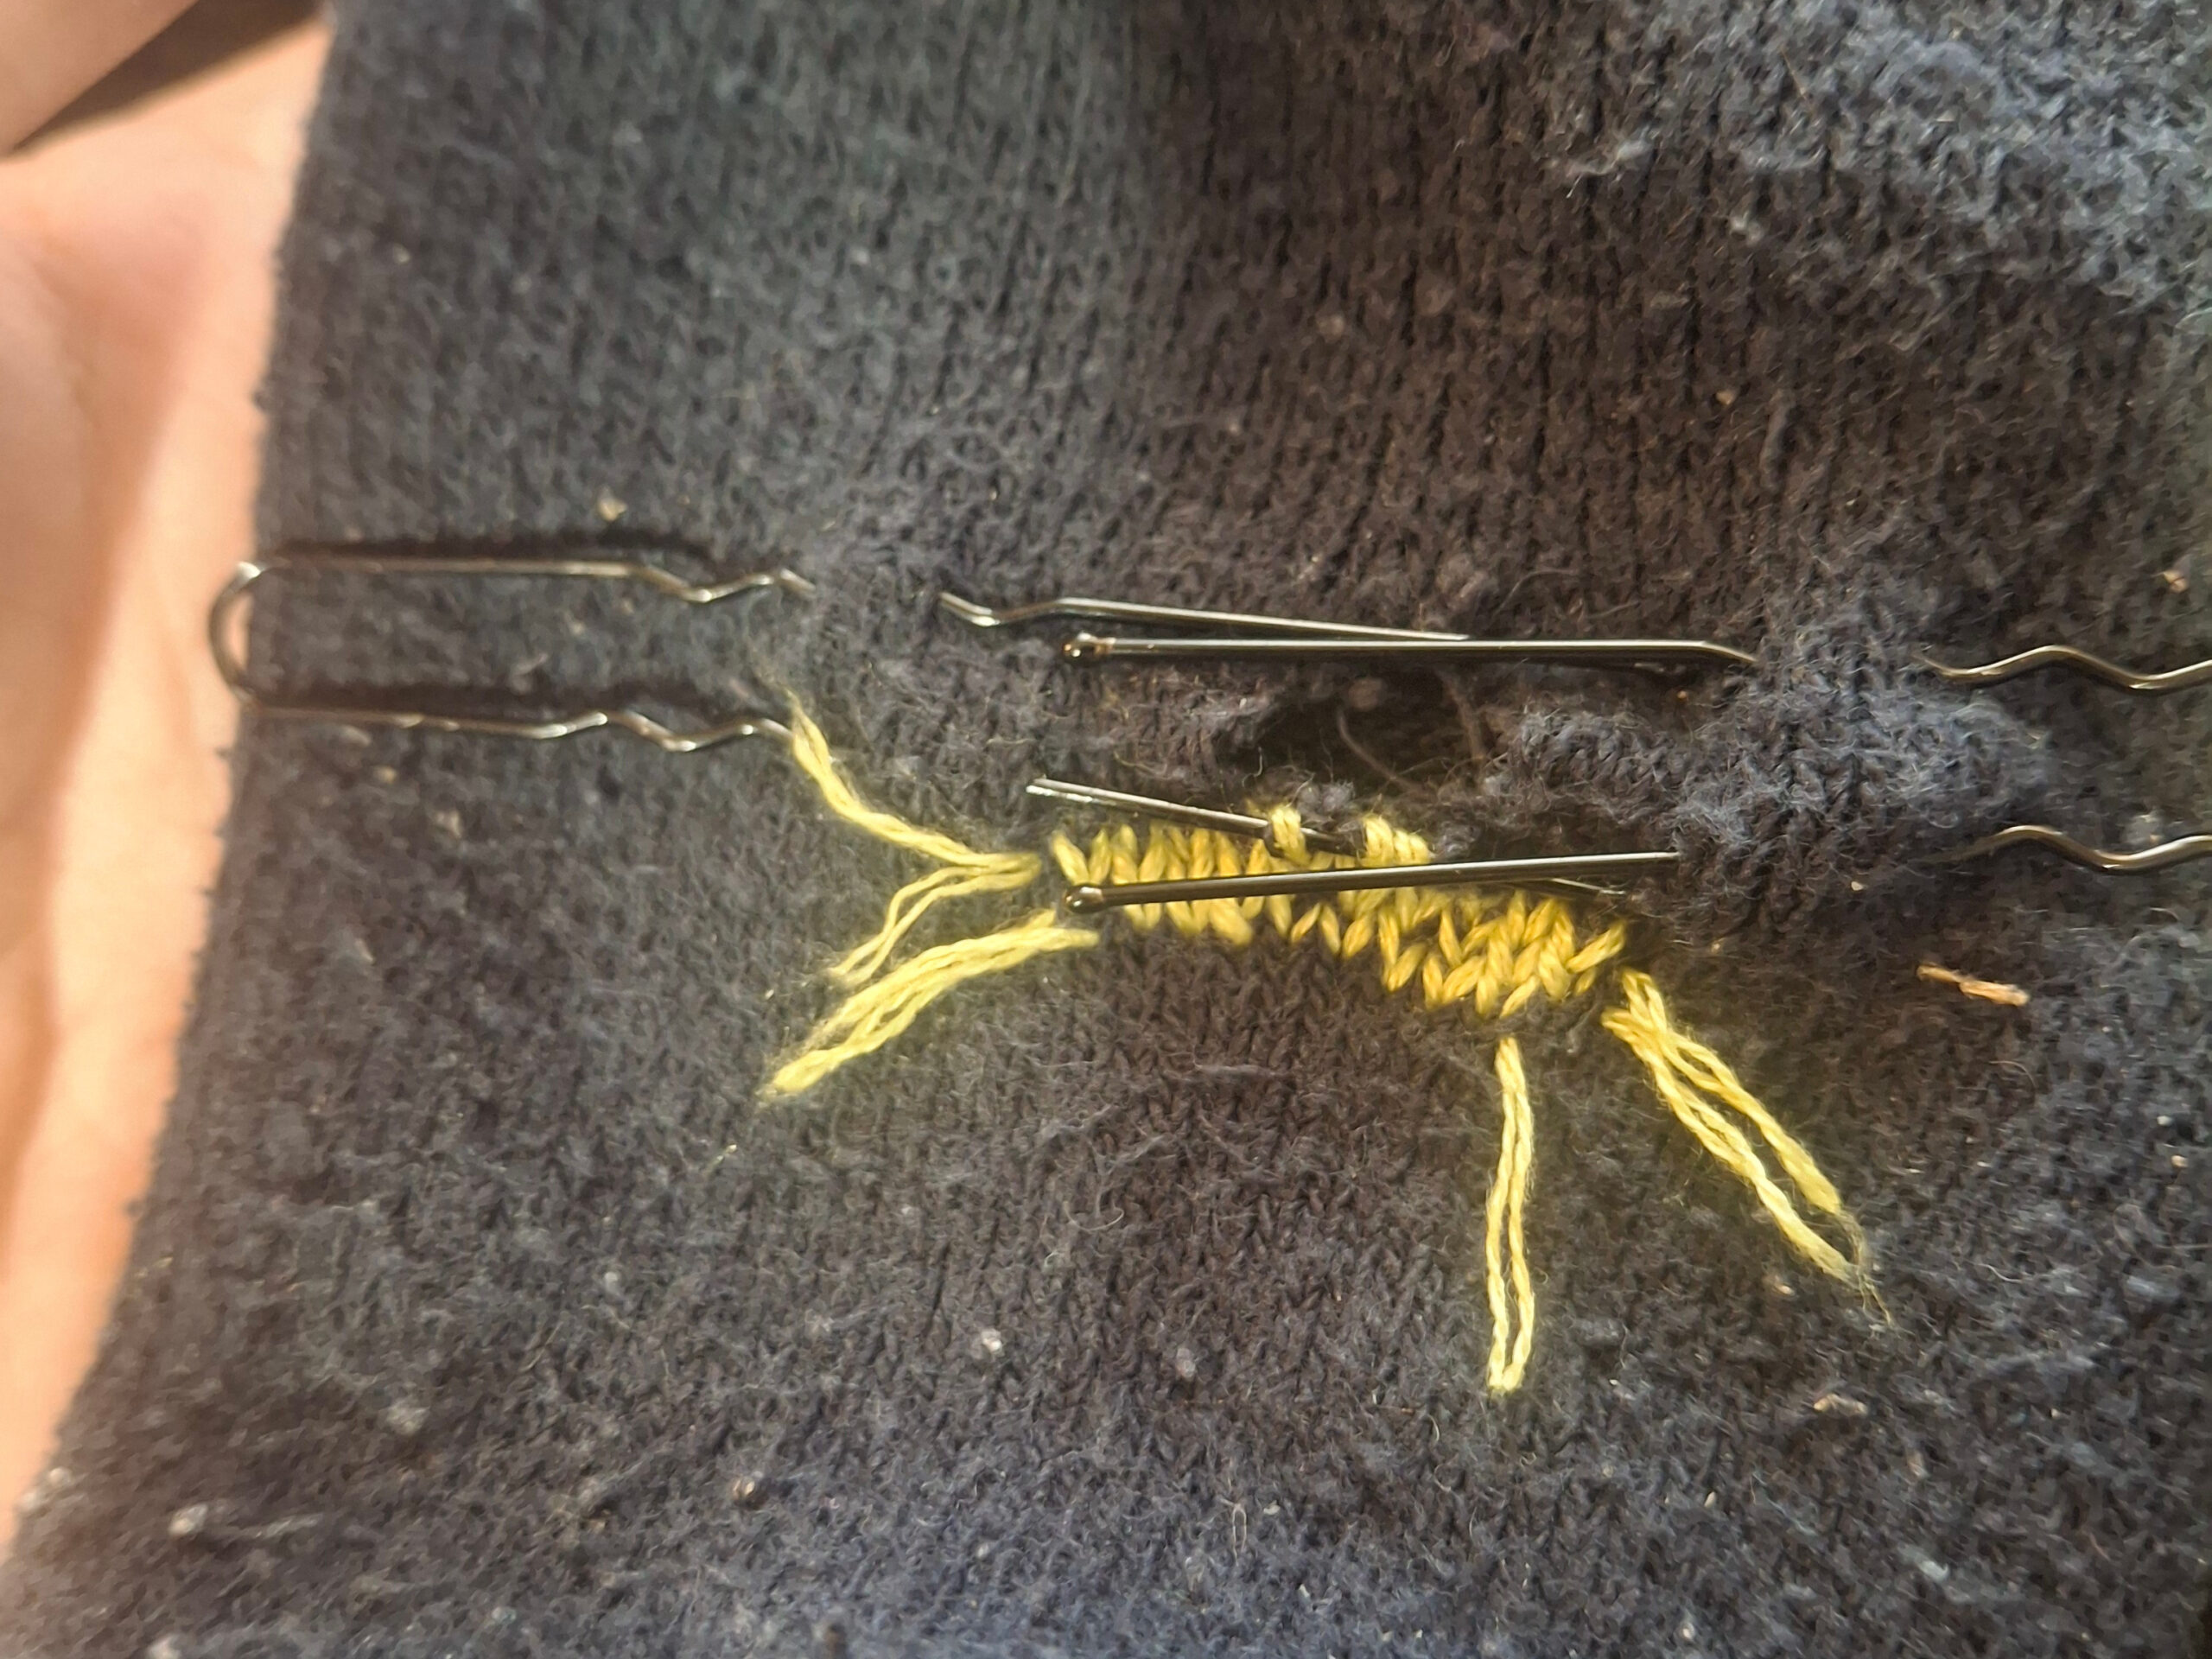
We’ve all lost socks to the Clothes Dryer Creature one time or another, haven’t we? This creature is, of course, an excellent reason to line dry our clothes when we can. But, since not everyone’s situation is conducive to that — your weather might be too cold, or humid, or rainy, or you might need the clothes sooner than that — at least some of us will have to keep feeding socks to the Creature.
The sock isn’t worn out overall, and the hole showed up in roughly the arch area of the underside, so not even a high wear area like the toe or heel. All I can figure about this hole is that the sock escaped from the Creature.
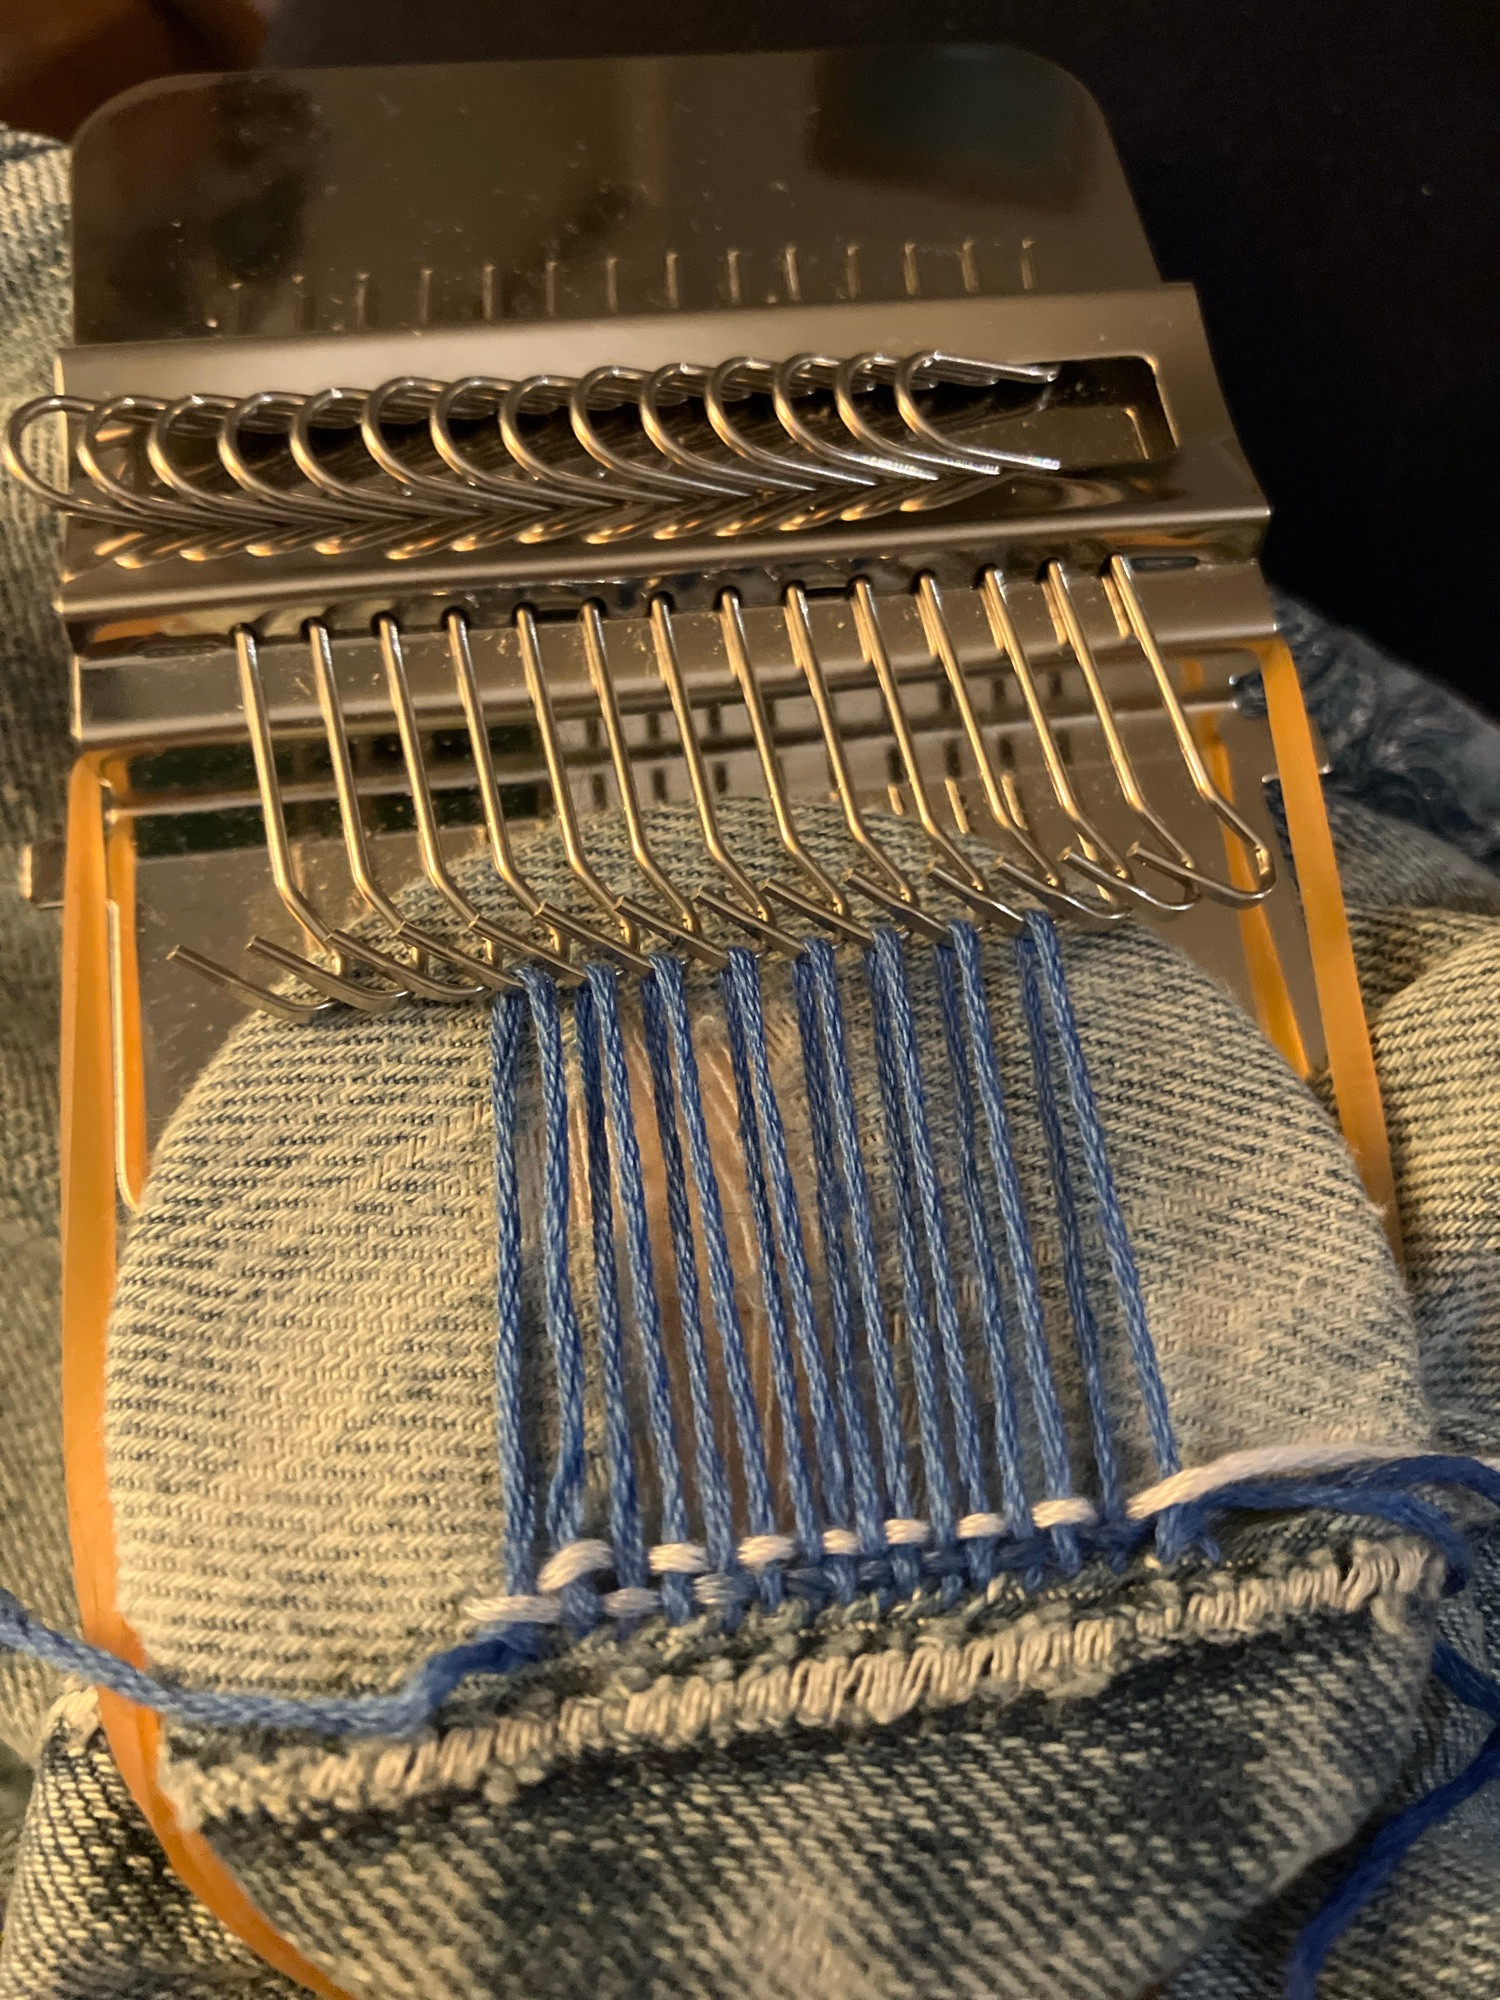
Throwing the sock away seemed like a bad reward for it showing the resilience it takes to get away from the Clothes Dryer Creature, and unraveling it to reclaim the thin yarn it was made out of didn’t seem that much better. I thought about darning it, but the trouble with darning is it makes basically a patch of woven fabric in the middle of a knit garment (the overall sock), and knit fabric is much stretchier than woven fabric. (Yes, you can set up a knit stitch that won’t be, but they don’t use that for socks.) The thought of a tight patch in the middle of a sock gave me preemptive sensory squicks. So, instead, I decided to make a knitted patch right in there.
First, I needed yarn or thread to make the patch out of. Sock hand-knitting yarn is thinner than regular knitting yarn; I actually do have some in the stash, but the yarn used in commercial sock knitting is even thinner. Even six-strand embroidery floss seemed thicker; I ended up splitting the floss down to two strands. Also, since the hole is in a place that doesn’t show, I didn’t even bother trying to match the color, so this is definitely a visible repair. Instead, I picked out a color that I don’t usually wear or use, that I only had because it came in a value pack. However, you could match the color or make a decorative design; that’s what I would have done if this hole were in a place that would show.
After getting the embroidery floss ready, I started a couple rows below the hole, and followed the path of the yarn in the sock with my thread. Instead of using the needle’s pointy end, I pushed the eye through to keep from splitting the sock yarn.
Then, I repeated the process on the next row up.
After that, I noticed that the next row up would have a bit of trouble staying in place because some of the stitches in the next row after it had been eaten by the Clothes Dryer Creature. So, I slipped in a hairpin to do more or less the job of a knitting needle by holding the loops that would become stitches until the next row of stitches were put through them to hold them in place, before putting in the next row of stitches.
Since the floss was getting really short at that point, the last few stitches were put in by using a very thin crochet hook, rather than an embroidery needle.
After that, I placed another hairpin coming across from the opposite side, and passed the loops across from one hairpin to the other. (A very thin knitting needle would have been even better for this!)
Then, I worked my way across the row again. When I got to loops that were on a hairpin, so filling in the hole, instead of on the sides of the hole, I took that loop off of one hairpin and made a loop on the other hairpin, similar to what happens in hand knitting with needles ordinarily but just guiding the thread with a needle instead of with some spare fingers.
After that, I mainly just repeated the process for each row. In further along rows, I ditched the floss when it got short, instead of working it through with a crochet hook. I also had to cut another length of six strands, so arguably I should have cut the whole thing longer in the first place.
Eventually, I got to the top of the hole. At that point, instead of catching the new loops onto the other hairpin, I caught them on the first row above the hole, closing the hole.
Finally, I followed the path of the sock yarn for a couple more rows again, making an upper border around the hole, and tucked in the threads’ loose ends. Now the sock is ready to wear again!
Would I do this again? Sure — it’s maddening to lose a sock that’s otherwise perfectly good; and, after all, it didn’t deserve to be thrown into the scrap bin after it escaped the Clothes Dryer Creature with its life. This technique would be especially worthwhile as a way to save handmade socks, for two reasons: if you still have the last of the yarn from making the socks you would have the option to use it to complete an invisible (or nearly invisible) repair, and although this process was slower than earning the cost of a pair of commercial socks, it was much faster than knitting a whole sock.
Her posts are visible for logged-in people only, but it’s worth a click to log in so you can pop over and see some more of her project pictures, and links to sites she recommends to buy one from.
I don’t have one of these, but it looks like the thread handling parts work somewhat like a loop-de-loom, which I do have; so, now I’m wondering how hard it would be to modify that into that.